Wednesday, August 29, 2012

Photo questions #1

Calling all photographers/people who enjoy taking photos!

Recently I have been learning to make better use of my  camera, but by no means do I fully understand this whole photography thing. Apparently there is more to it than:

"Oooo...pretty flower"

Point

               Zoom

                                Focus

                                               Ca-click!

Freshman year of college I took black and white photography using an old 35mm film camera. Dark room and all. My hands smelled like developing fluid for the next quarter and a half, and my negatives always seemed to be out of order. But the real fun was trying to jam the film into that wonky black container by feel...
All of this was a piece of cake compared to figuring out all the buttons and knobs on the Nikon my family gave me as a graduation present a few years later. I am lucky enough, however, to have a friend who was willing to answer lots of stupid questions, and a computer genius husband who showed me the basics of editing. That being said I am most certainly still a beginner.

So...I have questions...you have answers.

Or at least I hope you have answers, and are willing to share. :)

Here's my first question:

This is a photo I took at a friend's wedding a couple weeks ago. I like it...except for one thing...


I'm sure you've noticed that the left side of his vest is extremely sparkly. Whatever it was made of was disastrously reflective. I was able to tone it down a bit by raising the black point, reducing the amount of red, and lowering the highlights. These adjustments only made a dent in the blaring glittery-ness that is his vest. I would like to reduce the sparkle by about 75%, so we have a black vest with a little glisten from the sun, not a huge patch of fairy dust ( I edit with Aperture, by the way).
Is there a way to isolate that patch and bring it down a notch? Is there a way to avoid this problem altogether? If I were to take this photo again how might I shoot it better?

Feel free to pipe in! Any input is greatly appreciated!
Thanks, guys!


Friday, May 25, 2012

New Look!

My blog has a new look! I decided it needed to be a tad more polished. The header photo is a camisole I designed, modeled by my knitting/designing buddy, Jessica from jessicabolof.com. Still need to work up that pattern...
Anyhow, I've got more posts on the way, it's just that all those pesky photos need to be downloaded and edited so I don't bore everybody to tears. I guess I'm just a binge blogger when it comes to pictures. I like to shoot a bunch of projects before I go to the trouble of editing them. Then once I've got a nice queue of posts they get released periodically.
In my defense my poor old macbook is bogged down with loads of photos and enough English papers to sink a ship. Time to start putting them on my husband's computer.

Wednesday, May 23, 2012

Sweet Vanilla Coconut Butter

I got the idea for making this from Chocolate Covered Katie's blog, although my recipe has more ingedients. This stuff is really rich, but so delicious! I currently have some lumps of it in the freezer, waiting to be put on a stick and coated in chocolate.
I suppose you could probably spread it on bread like peanut butter, if you really wanted. Might make a nice filling for a cake or sandwich cookie too!

approx. 5-6 cups unsweetened shredded coconut flakes
1/3 coconut milk or coconut oil
the seeds of 1 vanilla bean
1/3 organic cane sugar

Dump ingredients in a food processor and blend until it forms a sticky dough. If you want it thinner add more coconut milk 1 tablespoon at a time. Store in the fridge or freezer.

Tuesday, May 22, 2012

Mild pesto

Pesto is such a potent sauce. I LOVE LOVE LOVE basil, but wasn't sure how I would feel about it in as large a quantity as pesto usually calls for. Here's something a little milder, but still smooth, creamy, and very bright green. :) The secret ingredient is coconut milk! Don't worry, the basil covers up any coconut taste. It's a tad cheaper than pine nuts, and more likely to be found in your pantry. The resulting texture is something like green alfredo sauce. Very yummy!

approx. 1 cup packed basil leaves (Any kind will do. I haven't tried it with sweet basil, but I think it would be really nice)
1/2 cup olive oil
1/2- 2/3 cup coconut milk
1/2 tsp kosher salt
1/2 tsp freshly ground pepper
1 clove of garlic

Rinse basil leaves. Put all ingredients in a blender and puree until smooth. If you want you can add a little more olive oil or coconut milk to made it thinner. Makes about 1 1/4 cup. Serve over hot pasta (With parmesan and more pepper, of course!). Refrigerate or freeze to store.

Saturday, May 12, 2012

Sugar free, dairy free hot chocolate

Near Christmas time a year and a half ago, back when my husband and I were still dating, I visited him at his sister's house and she made the best hot chocolate I had ever had. Unfortunately James could not drink it because of the high sugar content, and I technically shouldn't have either because it had a TON of dairy. I drank it anyway. Then I asked for the recipe and made it for my family. Then I almost threw up.
But boy was it delicious!

I wanted it so bad...
...so I came up with a similar recipe which both of us could drink safely:

4 cups almond milk (May contain some cane sugar. Check the label first)
1 can coconut milk (Lite works too, but for some reason it tends to separate from the almond milk. I recommend the full-fat kind)
1/3 cup Hershey's unsweetened cocoa powder
1/2 cup honey
1 tsp vanilla
pinch of salt

Whisk ingredients together over medium heat. Bring to a boil. Serve hot.

Someone told me it tastes like cupcakes. :)
I love the combination of flavors and that I can drink it without getting sick!

Wednesday, April 25, 2012

Decadent Sea Salt Brownies

I bought this bag of chocolate chips one time which had a really great brownie recipe on the back. Naturally it was packed full of sugar. It sounded so good, so I did what I always do: adapted it.
Here is my slightly healthier version.

Ingredients:
1 cup dark chocolate or carob chips
1/4 cup milk chocolate chips (optional)
2/3 cup whole wheat flour
2 eggs
1 tsp baking powder
1/2 tsp salt
1/2 cup vegetable  or coconut oil
1/2 honey
1/2 walnuts (optional)
Hershey's syrup 
course sea salt 

Preheat oven to 350°. Melt dark chocolate chips in microwave safe bowl for 1 min. Stir until melted completely. Add flour, eggs, baking powder, salt, honey, and vegetable oil. Stir in milk chocolate chips and nuts. Spread batter into 8X8 pan and bake for 25-30 minutes. Serve warm topped with a drizzle of Hershey's syrup and a sprinkling of sea salt.

Tuesday, April 3, 2012

James' Valentine's Day Gift


This what I made for James this Valentine's Day.


One of my few attempts at watercolor. I think it turned out pretty well. :)
It's a tree in the greenbelt behind our apartment. Maybe it doesn't look exactly like that tree, but at least it looks like a tree, right? :-)


Monday, April 2, 2012

Sugar-Free Carrot Pineapple Cake w/ Cream Cheese Frosting


I found the most amazing carrot cake recipe online the other day.
Here's the link:

But...it's Lent. And lots of people give of sugar for Lent. James can't eat it any time of the year. Not having done much baking with sugar for a while I was surprised by how much was in this cake. Then add a ton of sugary frosting and you've got a Lent-unfriendly, headache-inducing disaster. Bummer, since I really wanted to eat it...

So I changed a few things. 
Check out my revisions below for a HEALTHY cake and frosting that doesn't actually taste healthy.

 Ingredients I changed:
For the cake
~2 cups all purpose flour----> 2 cups whole wheat flour
~1 cup of granulated sugar + 1 cup of brown sugar ----> 1 cup of honey + a little baking powder (about  1/2 tsp) to help it rise properly

Those were the big ones. I did use fresh pineapple instead of canned, but only because that was what I had available. These also were no nuts or raisins in my cake (hate raisins, and somebody was allergic to nuts).

The frosting recipe is my own. Here's the post:

It didn't taste sugar-free and had no harmful replacements. Yay!

Now for the flowers. Check out this tutorial:

Yeah, I know it's in chinese. Just use the pictures. :) 


The flowers may be moist and a little squishy if they didn't get cut thin enough, but they should still hold their shape.
Place directly on the frosted cake and glue on additional layers with extra frosting. Add small carrot slices for the centers...since this is carrot cake and all...

Uh, YUM!

Sunday, April 1, 2012

Seed Stitch Neckwarmer


Seed Stitch Neck Warmer
 By Lexi Cushing


Materials 
Elsebeth Lavold Chunky Al (50% FS Alpaca, 50% Peruvian Wool; 50g = 75 m / 82 yd) [or any heavy worsted]
Main color: One ball dark red 
Contrasting color: One ball black 
Tools 
Size 8 needles 
Size K (10 1/2) crochet hook 
Gauge 
15-16 sts in 4 in.
Size 
One size fits most. 4 1/2 in. wide, 27 in. long.  For a longer neck warmer, get a second 
ball of dark red and continue in pattern until desired length. 
Pattern Notes 
Separate about 6-7 yards of main color before starting. 
Picot sequence: *3 sc, ch 3, sl in front loop of last sc, rep from * 

Neck warmer 
With main color, cast on 15 
Row 1: K1, *P1, K1, repeat from * until the end of the row. 
Next row: Rep. row 1 
Continue in seed stitch for 2 1/4 in. 

Button hole 
Next row: K1, P1, K1, P1, K1, P1, K1, bind off next stitch, attach the 6-7 yard length that 
was set aside earlier to next stitch, K1, P1, K1, P1, K1, P1, K1 
Next row: continue in seed stitch, keeping the two balls of yarn and sides of the button 
hole separate.  When the button hole has reached 2 1/4 in. long move on to next row. 
Closing the button hole 
Next row: K1, P1, K1, P1, K1, P1, K1, cast on 1, tie off smaller ball of yarn (saving extra 
for the flower button), K1, P1, K1, P1, K1, P1, K1 
At this point you should have 15 stitches on the needle again. 
Continue in seed stitch pattern until you have about 24 in. of yarn left.  Bind off. 

Picot edging  
With contrasting color, attach yarn to a corner of the neck warmer. Using picot sequence 
work in 30 picots (counting the corners) on each long side and 4 on each end of the 
neck warmer, in the corners work in 3 sc in same stitch while keeping in picot pattern. 

Flower button 
Layer #1: With contrasting color, cast on 30. 
Row 1: K30
Row 2: P30 
Row 3: K2tog 15 times 
Row 4: P15 
Row 5: K2tog 7 times, K1 
Row 6: P8 
Row 7: K2tog 4 
Row 8: P4 
Bind off.  
Sew side seam together to make a trumpet shape. 
Layer #2: With contrasting color make a second flower using the 8 row layer #1 pattern.  
Do not sew side seam. 
Coil layer #2 into a spiral and place on top of layer #1.  Using crochet hook, attach, 
looping yarn through several times to hold the two pieces together securely.  
Attach main color to the edge of layer #1 and, with crochet hook, sl sts along the edge.  
Rep for layer #2
Attach main color in center of flower: *Ch 5, sl in original st, Rep from * 2 times, ch 7 sl 
in same st. 

Finishing 
Attach flower button to neck warmer 4-5 in. from end furthest from button hole. 
Weave in all ends.


[Please note that this pattern belongs to me. You are free to share it, but not to use it for personal gain. Check out my Creative Commons License for more information. Also, please comment if you find any errors {or if you like it!} and I will fix it as soon as possible. Thank You!]

Opposites Attract

Who says red and green are only for Christmas? Or scarves only for winter? Not this knitter!


Opposites Attract
{crochet scarf}
By Lexi Cushing


Yarn: Cascade 220 Superwash, by Cascade Yarns. One ball of Sage {color A}; one ball of Red {color B}. Any worsted weight will do.

Hook size: J

Gauge: 12 hdc and 12 rows in 4 inches.

Notes: Don't worry if the gauge is a little off. It's just a scarf. Also, if wool is usually too warm or too itchy for you, try something smoother, like Sweater, by Spud and Chloe.


Scarf:
Using color A, ch 139
Row 1: Sk first 2 sts, dc in next ch, *ch 1, sk next st, dc in next ch, rep from *. Ch 2, turn.
Row 2: Hdc in each st across. Ch 2, turn.
Row 3: Dc in first st, *ch 1, sk next st, dc in next hdc, rep from *. Ch 2, turn.
Rows 4-5: Rep row 2.
Row 6: Sc in next 30 sts, ch 12, sk 12 sts, sc in remaining sts across. Ch 2, turn.
Rows 7-8: Rep row 2.
Row 9: Rep row 3.
Row 10: Rep row 2.
Row 11: Rep row 3.
Fasten off.  Weave in ends.
Flower Button:
Using color B
Petal sequence: sc 1, hdc 2, dc 1,tr 1, dc 1, hdc 2, sc 1
Ch 4, link ends to form a loop.
Round 1: work in 7 sc. Join, ch 1.
Round 2: Hdc 2 in each sc. Join, ch 1.
Round 3: (sc in first st, ch 3, sk one st) all the way around. Join.
Round 4: One petal sequence in each ch 3 loop.
Round 5: (Sl in back of sc of round 3, ch 4) all the way around.
Round 6: One petal sequence in each ch 4 loop.
Round 7: (Sl in back of sc of round 5, ch 5) all the way around.
Round 8: One petal sequence in each ch 5 loop, but this time double the number of dcs in each petal. Join, tie off.
Weave in ends.
Fringe:
Cut 42 6” pieces of yarn, tie on ends of scarf in groups of three.

Abbreviations:

Ch= chain
Sc= single crochet
Dc= double crochet
Tr= triple crochet
Hdc= half double crochet
Sl= slip
Sk= skip
Rep= repeat
St[s]= stitch[es]


[Please note that this pattern belongs to me. You are free to share it, but not to use it for personal gain. Check out my Creative Commons License for more information. Also, please comment if you find any errors {or if you like it!} and I will fix it as soon as possible. Thank You!]

Creative Commons License
Opposites Attract: (crochet scarf) by Lexi Cushing is licensed under a Creative Commons Attribution-NonCommercial-ShareAlike 3.0 Unported License.

Joe Cool Hat

This a gift I designed for my younger brother Joey. But it's a surprise for Christmas, so he couldn't see it. I had to recruit my other little bro, Tyler, to model it for me.

Introducing Mr. Cool: Tyler Cushing

Joe Cool

By Lexi Cushing

Materials
Rowan Pure Wool DK:
(Main Color) 1 ball Earth, (Contrasting Color) 1 ball Quarry
Tapestry needle

Needles
#6 dpns

Size
one size fits most

Gauge
22 sts and 28 rows over 4" (height of gauge is not especially important in the pattern, width matters more)

Notes
This color chart is a repeat of 10 stitches. If you think you might need to adjust the size either add or take away 10 sts in the cast on and continue with the pattern. Just remember that if you do your numbers will be slightly different than mine.

Also note that this pattern assumes knowledge of color work.

Color Chart


Body of Hat
Cast on 100 in MC

Rows 1-7: K2 P2
Switch to CC
Row 8: Purl
Row 9: Knit
Row 10: Purl
Row 11: Knit
Row 12: Purl
Next row: Using both MC and CC work in 10 repeats of color chart

Continue until you have made four 9-row repeats.
Next row: Working in color pattern *knit 8, k2tog, rep from * 9 times.
Continue working in the color chart for 1 inch, or desired length, keeping in mind that you now have 10 less sts (or 1 less st per repeat). Think about it as eliminating st #10 [in brackets on chart].

Top of Hat

Next row: working in color pattern as closely as possible *Knit 7, k2tog, rep from * 9 times.
Next row: *knit 6, k2tog, rep from * 9 times.
Next row: *knit 5, k2tog, rep from * 9 times.
Next row: *knit 4, k2tog, rep from * 9 times.
Next row: *knit 3, k2tog, rep from * 9 times.
Next row: *knit 2, k2tog, rep from * 9 times.
Next row: *knit 1, k2tog, rep from * 9 times.
Next row: *k2tog, rep from * 9 times.

You should now have 10 sts. Cut MC and CC at about 6". Using tapestry needle thread yarn through all 10 sts and pull the needle out. Gather loops tightly and secure with a knot.

Weave in all ends.
[Please note that this pattern belongs to me. You are free to share it, but not to use it for personal gain. Check out my Creative Commons License for more information. Also, please comment if you find any errors {or if you like it!} and I will fix it as soon as possible. Thank You!]

Sausage Rolls


 Perfect for High Tea!


Ingredients
Fully cooked sausage links
Your favorite biscuit dough
Spicy brown mustard
1 egg
Dried or fresh chives, minced

Preheat the oven to 400˚ F. Break dough into as many sections as you have sausages. On a floured surface roll out each chunk of dough to about two inches longer than your sausage, and several inches wider. Slather with mustard and sprinkle on some of the chives. Roll a sausage in each piece of dough and place on a cookie sheet or baking stone. Scrabble the egg with a fork and gently brush onto the tops of each sausage roll. Sprinkle with chives.
Bake for about 15 minutes, or until golden brown. Slice and serve warm.


Friday, March 30, 2012

Yummy chocolate "shake"

I like to have this sweet treat for breakfast sometimes to get in plenty of fruit 
while having a chocolate fix at the same time.
Ingredients
1 banana
1 kiwi
1 slice of pineapple or orange
1/4 cup dark chocolate chips
1/3 cup almond milk
ice cubes

Blend ingredients. Add ice cubes to thicken as needed. Yum! Enjoy!
Makes about 2 cups

Wednesday, March 28, 2012

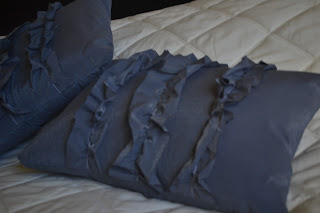
Ruffled Pillows From a Shirt

Men's large shirt + pillow forms = ruffly pillows!

To make these find an men's shirt (preferable size large). If your pillows are small then you should be able to get two pillow cases out of the shirt. Trace your pillow (with seam allowance!) twice on the back, cut out, then twice on the front while the shirt is buttoned together, cut that out too. 
The pieces without buttons are the front side of the pillows.
Cut the sleeves open and take the seams and cuffs off. Cut thin strips down the length of the sleeves.
Baste and gather, then sew onto the front !


Pin the front and back of a pillow together (ruffles and buttons facing inward!) and sew all the way around the pillow! Using the button side for the back allows you to take the pillow case on and off to be washed or swapped out! It even has a "cell phone pocket"!

Tuesday, March 27, 2012

Sugar-free Cream Cheese Frosting

Delicious frosting without the sugar! Tastes just as nice!

Ingredients

Two 8 oz packages of cream cheese
1/2 cup of honey
1/4 maple syrup
1 tsp vanilla
1/4 cup milk or heavy cream
a little corn starch to correct the consistency if necessary

Soften cream cheese to room temperature. Whip. Add honey, maple syrup, vanilla, and milk, and mix together. Adjust consistency as needed by adding more milk or cornstarch.

Makes enough frosting for an 8 inch 2-3 layer cake.

Ruffled Cake


Cute pink ruffled cake I made for a baby shower. Well, the first one was a test version. The second (the cake with the chocolate chip checker pattern on top) was actually for the baby shower.


It was a really fun cake to make. Soft dark chocolate with homemade raspberry jam filling and Swiss Meringue Buttercream frosting, which, by the way. is the best frosting EVER.


 That is...until you've "test tasted" it a few too many times and end up having too much...
Then no frosting tastes very good...

Here is the finished cake! It was SO yummy! To be honest I added the milk and dark chocolate chip checkers because I ran out of frosting...oops. But I was very proud of my improv. It added a lot of personality.


(Sorry for the lack of photo editing. I hit a little snag...)
To learn how to make Swiss Meringue Buttercream or frosting ruffles see this link: http://sweetapolita.com/2011/06/ruffles-roses-a-madish-tea-party/
She's got the best tutorial and most straight-forward recipe I've seen so far.

Tuesday, January 31, 2012

Quick Guacamole

James and I love to have this with nachos and refried beans on the weekend. We call it our Saturday lunch.

Quick Guacamole

Ingredients:
2 ripe avocados
1/4 cup chopped onion
half a Roma tomato, chopped
1 tsp lemon juice
1 tsp extra virgin olive oil
1/2 tsp garlic salt

Peel avocados and remove pits. Mash with a fork. Add chopped veggies, lemon juice, olive oil and garlic salt. Stir. If you want it to be spicy you could probably add some chillies.
Mmmm...
Serve right away. It will turn dark brown if you leave it out.

Friday, January 27, 2012

Avocado Frosting

Frosting is so sugary. :( I've wanted to make a less sweet version of frosting for a long time, but couldn't think of a way to get it thick enough (short of loading it with corn starch). But a while back I found a recipe for vegan ice cream. With a few changes it made a fairly good frosting. Thick, pudding-like texture, creamy, and all that. I liked it. So here's the recipe:

Ingredients:
2 ripe avocados
1/3 cup unsweetened cocoa powder
1/4 corn starch
1/2 cup honey
a pinch of salt
1/4 cup almond (or other) milk
1 tsp vanilla
optional: 1/4 powdered sugar (if you are not satisfied with the sweetness)

Peel avocados and remove pits. Smash in a stand mixer or food processor until smooth, then add other ingredients. Add extra almond milk or corn starch to adjust the consistency if necessary. Watch out for little green lumps of avocado hanging out in the frosting. It doesn't affect the taste, but it does look a little weird.
Spread onto a cake, or graham crackers, or whatever you like to eat with frosting.
I recommend storing it in the fridge over night before use to let the flavor deepen.

Thursday, January 26, 2012

Good-For-You Banana Muffins

My bananas were getting kinda brown so I whipped these up yesterday. They were really yummy! In fact, there isn't a single one left (No, I didn't eat them all by myself). I forgot to take a picture, but next time I make them I will be sure to snap a few shots. Not that they were super exciting to look at, or anything.

Ingredients:
4 very ripe bananas
3 eggs
2 cups of whole wheat flour
1/4 cup of olive oil
1/2 cup of honey
1 tsp aluminum-free baking powder
1 tsp baking soda
1/2 tsp salt
1 tsp cinnamon
1/2 tsp nutmeg

Preheat oven to 350°. Mash bananas. Unceremoniously dump all ingredients into one bowl and mix...blah, blah, blah...I won't bore you with the details. I'm sure ya'll know how to mix muffin batter. For fun you can also sprinkle some cinnamon and sugar over the top before you bake them.
Pour into greased muffin pan and bake for about 25 minutes or until a toothpick comes out clean (or mostly clean, if you didn't mash the bananas all the way like me) when inserted into the muffins.
Makes about 18 muffins.

Enjoy!

Message in a bottle

A great book needs a great bookmark. I like this project because it can be made really sweet, really girly, or really cool depending on who you are planning to give it to.

For this project you will need:
A small glass vial
Something to put inside it
Heavy wire
Pliers
Wire cutters


Cut roughly 10" of wire and carefully bend it into this shape:


Make sure the loops on the ends are pointing outward.
Twist a new piece of wire into a small spiral the size of the bottom of your glass vial. Pressing the spiral against the bottom of the vial gently twist the long end of the wire around it (I recommend getting it started by twisting around your finger first so you don't break the glass).  Wrap it snugly all the way around the  top.

Cut the wire about 1" away from the vial, bend it upward and form a loop. Connect it to the loop on the shorter end of the wire piece you bent earlier.


Fill your vial. I filled one with tiny sea shells. But here is something even cuter:


:)


 This one is for my husband. <3

Up-cycled shirt


I've seen these adorable things on the Internet and have wanted to give it a try. This one is for my mom.

You will need:
A long sleeve shirt
Felt
Beads
Thread
A needle
Scissors 

Start by finding an old shirt from your closet which you do not wear often, or don't like, or buy one at a thrift store. A stretchy knit is nice, but you could do this with a button-up blouse just as easily. It will just be stiffer and have less drape. This one is a very drapey knit.  I got it at Value Village for about $6.

If your shirt came from a thrift store wash it before up-cycling.


First things first: lop off the sleeves. Make sure you cut them the same length on both sides.


Turn the severed sleeves inside out and cut out the surged seam.

Plan your attack. If your shirt already has embellishments (like the tie on the left hip and the draped neckline of this one) then take those into account when planning your design, using them to your advantage. For example: because my shirt has a loose, hanging neckline I don't want to put anything too close to the edge of the neck, because it will just get lost in the hanging folds of fabric. I also don't want to add anything that requires too much structure to hold it in place.

Because this shirt looks so different lying down verses hanging, I worked on it hanging up. It helped a lot.

These sleeves were 3/4 length, so I had less fabric than I otherwise would have, but here is a way to get nice long strips out of short pieces of fabric:
Lay your sleeve flat and cut out a gumdrop shape.


From this piece cut another gumdrop.

And another.

And another.

This will give you three horseshoe shaped strips. These were perfect for my project.
Do the same with the other sleeve.

Take a strip and sew the two ends together (starting from the widest edge and working inward) like this:


 Loosely sew along the inner edge.

Pull it snug.

Next, take a small circle of felt and stitch it into the center of your flower.

For some bling I added a giant red plastic bead on top of the felt.

For the smaller flowers I added a few seed-like rustic glass beads to the center.

Now, decide where your flowers should go and start sewing them on!

Pretty!

Because these flowers are so big and loose they wouldn't stay open.

I gently tacked the large flowers open at four points along the upper half, three points for the medium flowers, and once for the small flowers to keep them open and beautiful.


While embellishing the right side I noticed that the weight was not evenly distributed because the flowers were pulling the neckline down. To regain balance I added a couple flowers on the left side, slightly higher than the right . It worked!


Here it is! Good luck with your up-cycling!